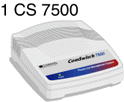
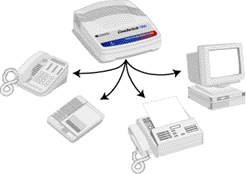
How to connect the CS 7500 for voice / Voice Mail / fax using Distinctive Ring service. |
|
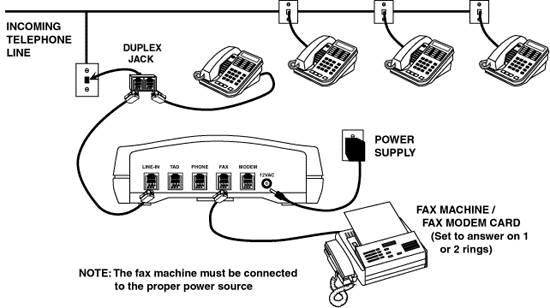
To automatically route calls to your fax machine, you must use the phone company's Distinctive Ring service (DRS). This service assigns multiple phone numbers to a single phone line. Each number is assigned a unique ring identity. Working in conjunction with this service, the CS 7500 identifies and individually directs two unique ring types to designated telephone devices or locations (i.e., fax, modem, roommates, teenagers, business line, etc.). |
|
|
NOTE: The name Distinctive Ring service may vary with each telephone company, as well as the ring types available. This service may not be available in some locations, but is required for use with this application.
Contact your local telephone company to verify availability in your area. |
|
|
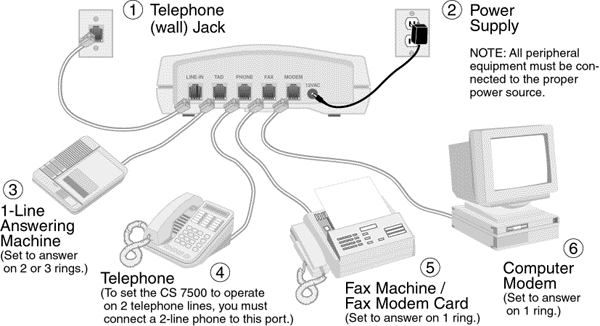
You must program the CS 7500 as follows:
|
1. |
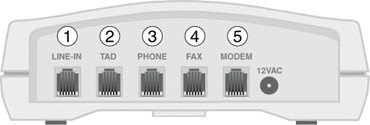
Connect a phone to the PHONE port |
|
|
2. |
Take the phone in the PHONE port off-hook
(pick up phone receiver) |
|
|
3. |
Press # * 114 * (three beeps) 80020 * (three beeps) * |
|
|
4. |
Hang up the phone |
|
|
5. |
Return the phone to the appropriate jack |
|
|
|
|
Your primary phone number will automatically ring all your extension phones. Your second phone number (which is the DRS number) will route calls to the fax machine. (You can connect a computer modem in place of the fax machine and obtain the same results.) |
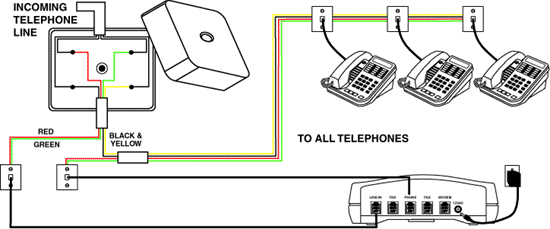
How to install ComSwitch to maintain exclusion on line 1. |
|
CAUTION: You should be a TELEPHONE INSTALLER, or be familiar with telephone wiring to complete this installation. If you have any questions, or are not confident that you can complete this installation procedure, contact Command Communications, or a professional installer for further instructions. (Look in the Yellow Pages under "Telephone Systems Sales and Service" to locate a professional installer.) |
|
|
For this procedure, you need the following equipment:
 |
a pair of wire snippers with stripping capability |
| |
a regular screwdriver and a Phillips screwdriver |
| |
two (2) RJ11 wall mount type jacks (available at consumer electronics stores) |
| |
two (2) phone cables |
| |
a utility knife |
|
|
|
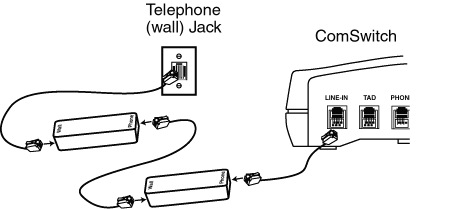
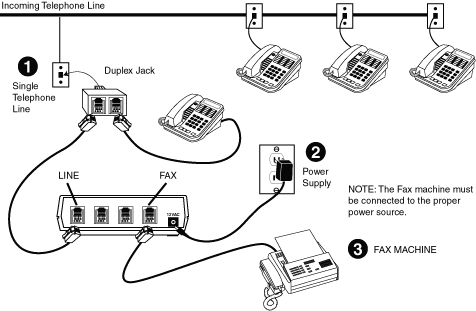
To install ComSwitch as shown, follow these steps:
| 1. |
Label one of the RJ11 jacks "#1" and the other RJ11 "#2." |
| The RJ11 jacks have four (4) posts: the red post is marked [R] the green post is marked [G], the black post is marked [B], and the yellow post is marked [Y]. |
| 2. |
Locate the telephone line from the phone company after it enters the premises but before it routes to any phone jack. |
| 3. |
With the utility knife, cut into the cable to expose the red, green, black, and yellow wires. |
| If the color codes of the wires are not red, green, black, and yellow, call Command Communications for further instructions. No phones connected to line one should have dial tone. |
| 4. |
Cut the red and green wires and expose the copper wire, while leaving the black and yellow wires intact. |
| 5. |
Connect the cut wires from the phone company to jack "#1" by attaching the red wire to the red post and the green wire to the green post. |
| 6. |
Connect the cut wires that feed all the phones in the location to jack "#2" by attaching the red wire to the red post and the green wire to the green post. |
| 7. |
Plug one end of a phone cable into jack "#1." |
| 8. |
Plug the other end of the phone cable into the LINE-IN port on the rear panel of ComSwitch. |
| 9. |
Plug one end of the second phone cable into the PHONE port on the rear panel of ComSwitch. |
| 10. |
Plug the other end of the phone cable into jack "#2." |
| 11. |
Connect the other equipment (fax, computer modem, answering machine) to the proper corresponding ports. |
|
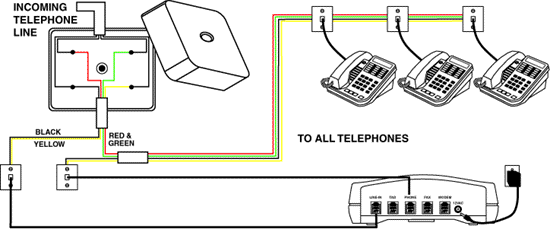
How to install ComSwitch to maintain exclusion on line 2. |
|
CAUTION: You should be a TELEPHONE INSTALLER, or be familiar with telephone wiring to complete this installation. If you have any questions, or are not confident that you can complete this installation procedure, contact Command Communications, or a professional installer for further instructions. (Look in the Yellow Pages under "Telephone Systems Sales and Service" to locate a professional installer.) |
|
|
For this procedure, you need the following equipment:
| |
a pair of wire snippers with stripping capability |
| |
a regular screwdriver and a Phillips screwdriver |
| |
two (2) RJ11 wall mount type jacks (available at consumer electronics stores) |
| |
two (2) phone cables |
| |
a utility knife |
|
|
|
To install ComSwitch as shown, follow these steps:
| 1. |
Label one of the RJ11 jacks "#1" and the other RJ11 "#2." |
| The RJ11 jacks have four (4) posts: the red post is marked [R] the green post is marked [G], the black post is marked [B], and the yellow post is marked [Y]. |
| 2. |
Locate the telephone line from the phone company after it enters the premises but before it routes to any phone jack. |
| 3. |
With the utility knife, cut into the cable to expose the red, green, black, and yellow wires. |
| If the color codes of the wires are not red, green, black, and yellow, call Command Communications for further instructions. No phones connected to line one should have dial tone. |
| 4. |
Cut the red and green wires and expose the copper wire, while leaving the black and yellow wires intact. |
| 5. |
Connect the cut wires from the phone company to jack "#1" by attaching the red wire to the red post and the green wire to the green post. |
| 6. |
Connect the cut wires that feed all the phones in the location to jack "#2" by attaching the red wire to the red post and the green wire to the green post. |
| 7. |
Plug one end of a phone cable into jack "#1." |
| 8. |
Plug the other end of the phone cable into the LINE-IN port on the rear panel of ComSwitch. |
| 9. |
Plug one end of the second phone cable into the PHONE port on the rear panel of ComSwitch. |
| 10. |
Plug the other end of the phone cable into jack "#2." |
| 11. |
Connect the other equipment (fax, computer modem, answering machine) to the proper corresponding ports. |
|
|
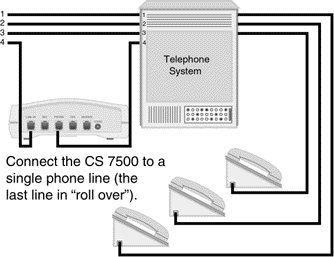
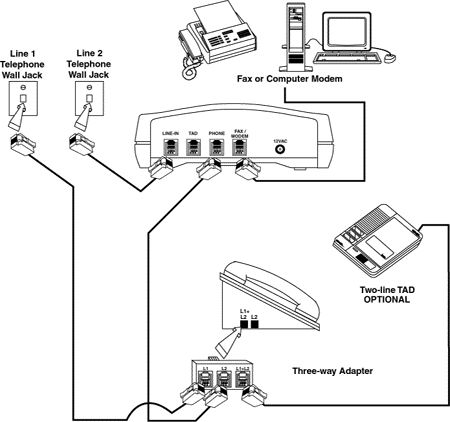
How to Connect ComSwitch to line 1 of a 2-Line System. |
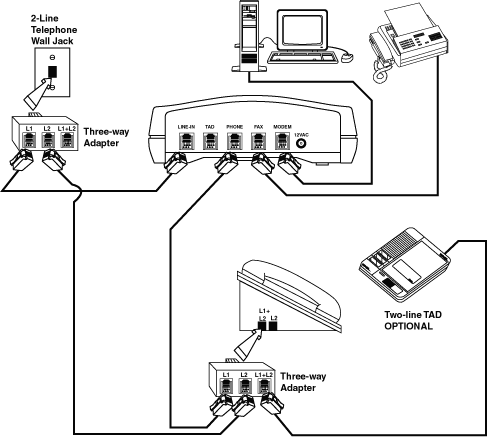
How to Connect ComSwitch to line 2 of a 2-Line System. |
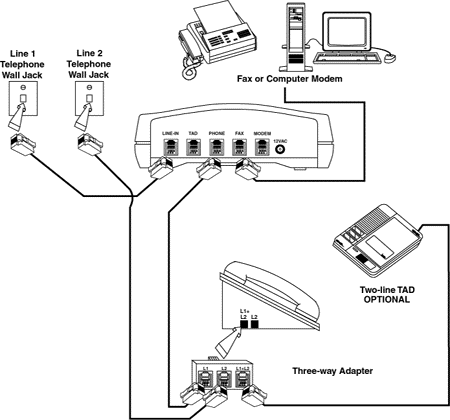
How to connect ComSwitch to line 1 of a 2-line system using three-way adapters. |
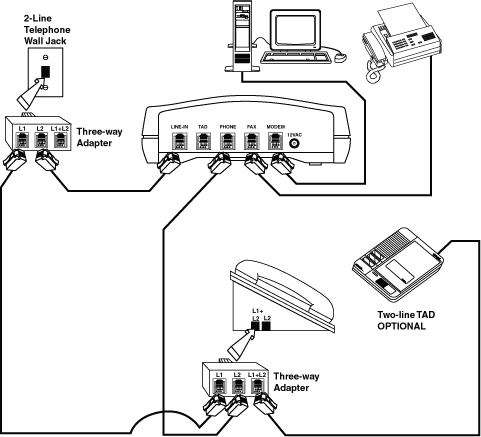
How to connect ComSwitch to line 2 of a 2-line system using three-way adapters. |
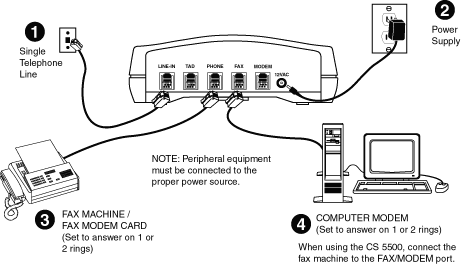
How to connect a computer modem and a fax to a single phone line. |
|
To perform this operation, the fax must be connected directly to the PHONE port, and the computer connected directly to the FAX port of the CS 7500 (FAX/MODEM port on the CS 5500). In addition, you must program ComSwitch as follows:
|
1. |
Connect a phone to the PHONE port |
|
|
2. |
Take the phone in the PHONE port off-hook
(pick up phone receiver) |
|
|
3. |
Press # * 011 * (three beeps) * |
|
|
4. |
Hang up the phone |
|
|
5. |
Remove the phone and reconnect the fax machine |
|
|
|
With this configuration, the calling fax only needs to dial your phone number, and ComSwitch completes transfers to the fax automatically.
Calls requiring access to the computer modem must use the following dialing string in their computer's software:
ATDT (phone number) ,,,#11,#11,#11
This operation accommodates all data transfer for both fax and modem, as well as outbound voice calls. Inbound voice calls are restricted.
NOTE: This application is for the OFFICE Mode only. |
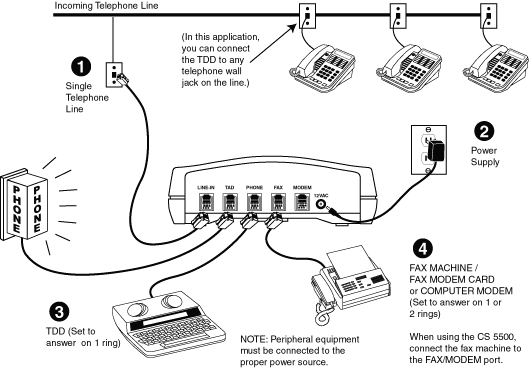
How to connect a fax and TDD to a single phone line using the Distinctive Ring Service. |
|
 |
|
|
To automatically route calls to your fax machine, and TDD, you must use the phone company's Distinctive Ring Service (DRS). The DRS from the phone company is a service that uses a single phone line for multiple phone numbers and assigns a unique ring identity to each phone number. Working in conjunction with this service, ComSwitch identifies and individually directs two unique ring types to designated telephone devices (i.e., fax, modem, and so on).
NOTE: The name Distinctive Ring Service may vary with each telephone company, as well as the ring types available. This service may not be available in some locations, but is required for use with this application. Contact your local telephone company to verify availability in your area.
Program the CS 7500 as follows:
|
1. |
Connect a phone to the PHONE port |
|
|
2. |
Take the phone in the PHONE port off-hook
(pick up phone receiver) |
|
|
3. |
Press # * 114 * (three beeps) 80120 * (three beeps) *
(If the TDD is connected to a telephone wall jack,
press # * 114 * (three beeps) 80020 * (three beeps) * |
|
|
4. |
Hang up the phone |
|
|
5. |
Return the phone to the appropriate jack |
|
|
|
|
|
Program the CS 5500 as follows:
|
1. |
Connect a phone to the PHONE port |
|
|
2. |
Take the phone in the PHONE port off-hook
(pick up phone receiver) |
|
|
3. |
Press # * 114 * (three beeps) 8012 * (three beeps) *
(If the TDD is connected to a telephone wall jack,
press # * 114 * (three beeps) 8002 * (three beeps) * |
|
|
4. |
Hang up the phone |
|
|
5. |
Return the phone to the appropriate jack |
|
|
|
Your primary phone number will automatically ring all of your extension phones as well as the TDD. Your second phone number (which is the DRS number) will route calls to the fax machine. (You can connect a computer modem in place of the fax machine and obtain the same results.) |
How to connect ComScan for voice / voice mail / fax using the Distinctive Ring Service. |
|
 |
|
|
To automatically route calls to your fax and computer modem, you must use the phone company's Distinctive Ring Service (DRS). The DRS from the phone company is a service that uses a single phone line for multiple phone numbers and assigns a unique ring identity to each phone number. Working in conjunction with this service, ComScan identifies and individually directs two unique ring types to designated telephone devices (i.e., fax, modem, and so on).
NOTE: The name Distinctive Ring Service may vary with each telephone company, as well as the ring types available. This service may not be available in some locations, but is required for use with this application. Contact your local telephone company to verify availability in your area.
Your primary phone number will automatically ring all of your extension phones. Your second phone number (which is the DRS number) will route calls to the fax machine.
Program ComScan as follows:
|
1. |
Pick up a telephone receiver from any phone on the line connected to ComScan |
|
|
2. |
Press # * 310 * (three beeps) * |
|
|
3. |
Hang up the phone |
|
|
|
|
|
Once the telephone equipment is connected to ComScan, and the "DRS" is in service, you can distribute your primary phone number for direct dial to your telephones, while your secondary phone number transfers calls directly to the fax machine. Unanswered voice calls will be taken by your voice mail. |
How to Use Remote Message Notification (CS 7500).
|
|
Remote Message Notification (RMN) operates in either the Automatic or Semi-Automatic mode.
The RMN feature allows the CS 7500 to automatically dial a telephone number when it receives a call to the TAD, FAX, MODEM, or a combination of these ports. This feature is beneficial to notify you in the event of an important call or data transmission.
After an incoming call is complete (5 seconds), the CS 7500 calls the user-programmed RMN phone number. Once the CS 7500 dials the phone number, it produces a series of beeps (see RMN Conditions) for 1 minute, which indicates the port or ports that received the call. You can set the RMN phone number and the RMN conditions "on location" or remotely (see RMN Phone Number and RMN Conditions).
While the CS 7500 is on-line transmitting the beeps, it also allows entry of the Security Access Code to enter the remote programming mode. If the CS 7500 receives a valid access code (#0) to transfer the call to the TAD and PHONE ports, the call will be transferred and the caller can retrieve the message. If a valid code is not received after 1 minute, the CS 7500 will disconnect the call.
The factory setting for RMN is OFF. To change this feature perform the following steps:
To turn this feature ON:
|
1. |
Take the phone in the PHONE port off-hook |
|
|
2. |
Press # * 117 * (three beeps) * |
|
To turn this feature OFF:
|
1. |
Take the phone in the PHONE port off-hook |
|
|
2. |
Press # * 017 * (three beeps) * |
|
Return to Top
RMN Conditions
RMN Conditions operate in either the Automatic or Semi-Automatic Mode. This feature allows you to define which port or ports being accessed will invoke RMN. The CS 7500 will activate RMN under the following conditions:
|
TAD, FAX and MODEM message |
|
For the CS 7500 to invoke RMN after a TAD message is received, the TAD port must be on-line longer than the value of the TAD Transfer Timer (default 30 seconds). If the TAD port is not on-line longer than the TAD Transfer Timer, the CS 7500 will not activate RMN, or will exclude the TAD as part of the RMN information (depending on the setting of RMN Conditions).
If the FAX or MODEM ports are accessed for any amount of time, and the CS 7500 is set up to activate RMN when the FAX or MODEM port receives a call, the CS 7500 will dial the RMN phone number.
After the CS 7500 dials the RMN phone number, it begins transmitting a series of beeps indicating which RMN condition was met. The following list indicates the RMN condition and the series of indicating tones produced by the CS 7500:
|
TAD and FAX message = 3 beeps |
|
|
TAD and MODEM message = 5 beeps |
|
|
FAX and MODEM message = 6 beeps |
|
|
TAD, FAX and MODEM message = 7 beeps |
|
The factory setting for RMN Conditions is # * 701 *. This allows the CS 7500 to activate RMN if the TAD port is accessed under the previously stated conditions. 1 represents the TAD port, 2 represents the FAX port, 3 represents the MODEM port. When programming the CS 7500, any digit can be entered or all three. Program the CS 7500 as follows:
|
1. |
Take the phone in the PHONE port off-hook |
|
|
2. |
Press # * 70 _ _ _ * (three beeps) *
(blank keys represent new RMN Conditions) |
|
Return to Top
RMN Phone Number
The RMN Phone Number operates in either the Automatic or Semi-Automatic Mode.
This feature designates the phone number that is dialed by the CS 7500 when RMN is activated and all RMN Conditions have been met. The phone number can be up to 16 digits long and must be programmed into the CS 7500. It will remain in memory until you remove it.
There is no factory setting for this feature. To enter an RMN Phone Number, perform the following steps:
|
1. |
Take the phone in the PHONE port off-hook |
|
|
2. |
Press # * 71(up to 16 digit phone number) * (three beeps) *
(entries following the * 71 represent new RMN Phone Number) |
|
Return to Top
TAD Transfer Timer
The TAD Transfer Timer operates in either the Automatic or Semi-Automatic Mode.
This feature designates the timing parameters for operation of the Automatic TAD Transfer feature. It is designed to facilitate the timing parameters of fax machines that do not produce CNG tones. When using the Automatic TAD Transfer feature, set this feature to 5-10 seconds longer than the outgoing message of the answering machine. If the outgoing message is 10 seconds, set this timer to about 15 seconds.
This will allow adequate time for non-CNG faxes to reach the fax machine, yet allow callers to leave messages on the answering machine without transferring to the FAX port when the call is complete (if their message is longer than 5 seconds).
The factory setting for this feature is 30 seconds (range of 0-99). To change this feature, perform the following steps:
|
1. |
Take the phone in the PHONE port off-hook |
|
|
2. |
Press # * 50 _ _ * (three beeps) *
(entries following the represent new TAD Transfer Timer setting) |
|
|
|